Sunday, December 12, 2010

Day 12 - Christmas Bon Bons


The final day of the 12 Days of Christmas is up on the classroom blog.

Why not have a go at making your own Christmas Bon Bons / Crackers.

Saturday, December 11, 2010

Day 11 - Christmas Cards


Michelle has created these fantastic Christmas Cards.

Check them out here

http://divasfreeclassroom.blogspot.com/

Friday, December 10, 2010

Day 10 - Christmas Layout


Marion has created this gorgeous Christmas layout. Full instructions can be found in the Divas Free Classroom.

Thursday, December 09, 2010

Day 9 - Christmas Banner

Day 9's project is a Christmas banner.

Check it out here

http://divasfreeclassroom.blogspot.com/

Wednesday, December 08, 2010

Day 8 - 8 Page Mixed Media album

Day 8 is up on the Diva Classroom blog - a 8 x 8 inch 8 page album.

Tuesday, December 07, 2010

Day 7 - Frame Wall Art

Renee has made this lovely set of 7 decorated frames.
What a clever & cheap idea for a Christmas Gift.


Check her instructions out here

http://divasfreeclassroom.blogspot.com/

Monday, December 06, 2010

Day 6 - Table settings

Lizzie from Embellees has created some gorgeous table settings for Christmas.
I want to go to her house Christmas Day just to get my hands on her treasures!!!!


http://divasfreeclassroom.blogspot.com/

Sunday, December 05, 2010

Day 5 - Gift Tags


Gift tags are quick and easy to make and give your gifts a lovely homemade touch.
Check out these ones in the Diva Free Classroom here
http://divasfreeclassroom.blogspot.com/

Saturday, December 04, 2010

Day 4 - Gift Bags

Marion has created these gorgeous gift bags and given full instructions on how to make them yourself.

Aren't they lovely.

Friday, December 03, 2010

Day 3 - Gorgeous Garlands

Lizzie from Embellees has created a number of gorgeous garlands.
Check them out further in the Diva Free Classroom.

Thursday, December 02, 2010

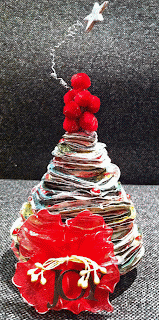
Day 2 - Christmas Tree

Check out the Diva Classroom blog for the instructions to make this fantastic Christmas tree.
Michelle has done an outstanding job.

Wednesday, December 01, 2010

On the 1st Day of Christmas

Day 1's project is now up in the Diva's Free Classroom.
Go check it out.
Natalie

Tuesday, November 30, 2010

12 Days of Christmas

Starts tomorrow and will be held in the Divas Free Classroom - link is on the left hand side.

Hope to see you all there. We have some wonderfully talented ladies sharing some great projects over the next 12 days.

Natalie

Friday, January 15, 2010

WEEK 2 - PAPER STORAGE IDEAS

Firstly how did everyone go with last week's challenge. Did you write your lists and know what stuff you have to work on. Well I did and I hope you did too.


Now this week we are going to get a start on Paper Storage. The main staple of scrapbooking. We can't do without our paper.


Firstly we must decide how we are going to sort our papers before we decide on storage ideas.


CARDSTOCK


Now what I just did was sort my cardstock into colours like pinks, browns, blues, greens etc. You might like to do this or to sort into themes or into manufacturers. I found for cardstock that sorting into colours was very easy.
How do you shop for cardstock and patterned paper? When you come to my crop days or you go to your LSS how do they have their cardstock in their store displayed. Or when you go online to buy do you head straight for your favourite manufacturer and paper line. Do you shop by colour, theme or manufacturer. When you have answered these questions these might help you decide what style you would like to go with.


PATTERNED PAPER


Now I found this a bit harder. I think I had my patterned paper in my containers by colours but when I was cleaning and deciding what I wanted to do in my room I decided it would work better by manufacturer. So that is what I have done. Again use the method above to decide what your style you would like to go with.


Maybe you scrap predominantly event-based layouts, do mini albums on a certain theme or have lots of themed patterned paper, then you will want to organise your papers by theme.


STORAGE


So now you have decide how you are going to store your papers whether it be vertical or horizontal.

One tip if you are using a wire paper rack you need to have the paper on the top of the rack either in a zip lock bag or a page protector so that the dust and dirt does not ruin the paper.


Here are some images of some storage ideas I have found.


There are hundreds of vertical and horizontal storage solutions out there you just need to find the one that fits what you are looking for and of course make sure it fits the papers that you wish to store. Take a piece of the paper/s that you want to store with you when you go shopping. I didn't actually have to go shopping, I used what I had already at home. I will post a picture of my paper storage. I use the wire paper racks. My only problem is that my wire paper racks also come to the crop days to put my patterned papers in. So it means that I will have to take my papers out of the racks to take to the crop days so I think I will be hunting around for some cheap ones.

Use rigid containers or dividers to avoid creasing the papers.
Consider placing the vertical storage containers on an adjustable bookshelf so you can minimize the amount of wasted space between shelves. Warning: Paper stacks can be heavy, so don't put too much on one shelf.

As inexpensive substitutes for upright shelf dividers, consider stackable plastic sorting trays found at office supply stores. 

Whichever storage method you choose, look for see-through containers. It's much easier to work if you can quickly identify the contents inside your bins.
To really cut down on searching time, label your containers as well.  If you're using rigid containers, simply computer-print or handwrite a label on a strip of card stock or a tag and attach to the box front. Even when using see-through containers or open, vertical storage, an easy-to-read label will make finding things at a glance easier.

SCRAPS

Now for those other bits of paper that we seem to collect called SCRAPS.


Again how do you store those SCRAPS or another question do you even use your scraps. If you don't touch them (like me LOL) get rid of them. Either donate them to your local school or to a charity. If not put them in the recycling bin.


You can again store them by colour which I think is the easiest way, you can sort them by size or their intended use eg, photo mats, frames.
Now I have a big plastic storage container that has a few drawers in it and when I was cleaning last week I only had one large draw left so I chucked all my scraps in the one draw. Not ideal but at least they are all in the one spot.
I think the ideal way would be to have a similar plastic storage container that has say about 6 drawers and put them in colours.


These drawers from Ikea are only $24.99.


Put scraps in zip top bags - you can hang them from a Clip It Up, a rod, or a skirt hanger, or sit the bags upright in bins or boxes.

Saving your scraps is a great way to stretch your scrapbooking dollar, but keeping them organized is the only way you'll really be able to take advantage of the little pieces. 


Here are a few tips from the book Organisation Tips for Scrapbookers on how to Scrap Savvy.


1. Trimming - Make scraqps appealing - trim torn, punched or bent edges befroe filing.
2. Sizing - If you typically need scraps for photo mats and letter blocks or strips for punching, consider precutting scraps to those sizes and designating a bin specifically for each size.
3. Sorting - File scraps with the same system ou use for cardstock and patterned paper to help you locate colours and designs quickly.
4. Viewing - Situate your scrap container where you'll consistently check it.
5. Combining - If you always bypass the scrap bin, store pieces in folders next to your full sheets of cardstock and paper.
6. Remembering - Routinely sift through your scraps first thing when making cards and gift tags, mini albums, die cuts, punches,labels, collages and accents - before you ever look through your full paper storage.


So this week I want to see some photos of your paper storage and I also want anyone else who has any suggestions that might help us regarding paper storage to post them either here or in the forum.

Friday, January 08, 2010

Divas Scrap Room Organisation Tips and Hints Week 1

WEEK ONE - GETTING TO KNOW YOUR SCRAP SPACE.


Welcome everyone to a weekly post of hopefully some useful and fun information to get you started on organising your scrapping area whether it be a room, desk or the dining room table.


Lots of people including myself have said that this year is the year for Organising. So I thought I would help you and myself and hopefully we will get organised together.


Probably the first thing everyone needs to do is to PURGE, THROW OUT, GET RID OF, DONATE, CULL whatever you would like to call it before you start. Let go of those items that you have had for years and still have not used. If you want you can go to the forum and participate in our hot potato swap cause as the saying goes someone's trash is someone else's treasures. http://www.scrapbookdivas.com.au/forum/viewtopic.php?f=65&t=1458


Tonight I sat down to scrap and couldn't find anything that I wanted. You don't have to do everything all at once but start with little baby steps.

So this first week is about looking at your scrap space as a whole.


So what I would like you to do is whilst you are scrapping this week, have a pen and notepad beside you and write down at every step whilst completing your layout or project how your supplies are helping or hindering your scrapping process.
for example So where are your photos, do you have to go look for them!!!!. Your journalling tags, pens, inks, stamps etc. does it take you half an hour to find your scissors or tape.
you should go through all your supplies and take note of whether they are easy to find. Hopefully you will see a trend in what supplies and storage works well for you. Maybe you have them labelled clearly, they are close to your scrapping desk, they are in vertical files. Then you can start to apply the things that work for you to the things that are not working so good.


Like I said earlier I couldn't find anything tonight when I sat down. LOL


So firstly I would like you to post your list of what works and what is not working for you here in the comments section or in the forum under week 1.
I would also like you to take a photo of your scrap space now as it is. Don't worry about what it looks like but hopefully at the end you will see the transformation. And post it either in the comments or in the forum.

I would also like you to during the week to close your eyes and visualise your dream room and think about the things that are not working for you in your room and how or what you would like to do to make that easier and better. For example at the moment I have all my patterned paper and cardstock in vertical paper storers in my crop tote under my roll top desk in my scrap room. So in my dream space I would like to have paper racks where my roll top desk is with all my patterned papers and cardstock within easy reach of my scrapping area. Jot down the possibilities as you go through each of the problem areas on your list.
Because when we get to paper storage you will have an idea of what you would like and I will be giving you hopefully more suggestions and ideas as well. So by jotting down the ideas as you go you will be well on your way to an organised scraproom.


What Works.


1. Photos - I print as I want photos to scrap plus my photos are stored in a box


2. Magazines are in magazine holders and I have made some of my own with cereal boxes.


3. acrylic stamps stored in a A4 folder in plastic sleeves but this is not ideal


What needs help


1. Paper storage - it is in colours but is not accessible


2. Tools - this only needs a little help as it is accessible just needs some further organisation


3. Photos are stored in a box but in no particular order


4. embellishments are in need of a total overhaul. they are currently stored in clip lock bags


5. Ribbon is stored in clip lock bags in my tote


6. stickers stored in a clip lock bag in my tote


7. stamps stored in a box still in their packages.


Scrap room photos before I started this morning......


And yes that looks disgusting doesn't it.
so come on and enjoy the ride. I started cleaning out this morning and it feels great.